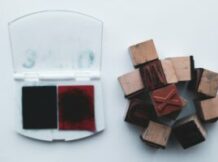
Rubber stamps are a great way to add pizzazz and charm to greeting cards, gifts and other items. To accomplish a brilliant design using craft rubber stamps, you can utilize any of the following three materials:
- An ink pad – When using an ink pad and rubber stamps for crafts, be sure to choose a high-quality stamp ink pad, such as the ones we sell on RubberStampStation.com. Once you have the ink you’d like to use, open it and gently press the rubber stamp onto the ink pad a few times. Check that the entire image is covered with ink, and then lightly but firmly press the stamp down onto paper or another item. For best results, this should be done on a hard, flat surface such as a desk. Once you’ve made your impression, lift the stamp up straight without moving it around. To become familiar with the process of stamping with ink, it may be wise to do a trial run on a piece of scrap paper first.
- Paint – Paint works great when using craft rubber stamps on surfaces like canvas or wood, as it generally shows up better and lasts longer than ink. To apply paint to your stamp, you can either use a sponge or a paper towel. Using either method, put a thin, even coat of paint on the stamp face so that the whole image is covered. Press the stamp down firmly but not too hard, as this may cause excess paint to squeeze out on the sides of the image. When you’re finished, lift the stamp up and wash it off using one of these rubber stamp cleaning methods.
- Water-based markers – Markers provide an easy way to produce beautiful multicolored stamp impressions. When using them, just check that they aren’t permanent to avoid damaging your rubber stamps for crafts. Once you’ve done so, gather the markers you’d like to use and hold the stamp in your hand or place it on a flat surface with the rubber side up. Color the image as desired using the markers and gently press the stamp onto your chosen item. You’ll want to work as quickly as possible when using multiple colors, as marker ink dries faster than stamp ink or paint when exposed to air.
Now that you’ve read this post, you’re ready to start creating unique handmade items using your rubber stamp collection!
Don’t Have Craft Rubber Stamps? Order from RSS!
In order for this blog post to benefit you, you’ll of course need rubber stamps for crafts. If you don’t already have them or you’d like to purchase more, head on over to the Rubber Stamp Station website. With our custom stamp maker portal, you can design your rubber craft stamps with just a few clicks. And if you need assistance, we’d be happy to help – call us at 1 (850) 7STAMPS. Thanks for taking the time to keep up with Rubber Stamp Station. We truly appreciate your business!